Jenoptik
1500 W. Hamlin Rd.
Rochester Hills, MI 48309
Phone: 248-853-5888
Fax: 248-853-1505
https://www.jenoptik.com/products/metrology
Versatile mobile surface measurement
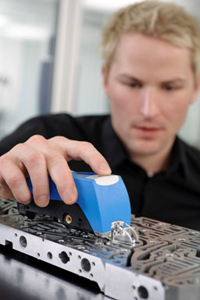
Light and compact in design, easy to operate with long-lasting battery power, the Waveline W5 surface roughness measuring system is ideally suited for measurements throughout the shop.
Wireless, it’s also the easiest to use and packed with capability. Lighter and smaller than the competition, it still has room for a large easy-to-read 2” color display. The colored display of the measurement results depending on the tolerance evaluation allows the measurement results to be assessed at a glance.
Capable of a wide range of measuring tasks using an extensive array of probes and accessories, the W5 can match the performance of more expensive stationary systems with its accuracy and precision.
The new Waveline W5 is ergonomically designed, with the device easily fitting into the user’s hand, making it simple to precisely position on the workpiece. The W5 tracks five measurement programs, 25 different roughness parameters and stores up to 100 separate profiles or a total of 10,000 results. The W5 is capable of more than 800 measurements on a single battery charge.
An integrated click wheel allows the operator to intuitively select device functions. In conjunction with the large color display with graphic interface, this makes operation of the W5 simple and transparent, delivering easy to see results and tolerance evaluations.
Measuring results may be quickly printed out on the optional printer—wirelessly via Bluetooth technology.
The roughness probes and measuring instrument electronics are calibrated independently from each other at the factory. This eliminates the need to make regular adjustments to the amplification or to recalibrate —a big advantage for everyday measuring.
Versatile application
Extendable tripod legs can be used to adjust the measuring instrument to the height of small workpieces. This allows such measuring applications to be implemented without an additional means of holding.
A support prism centers workpieces like small shafts from 10mm diameter reliably on the correct measuring position and protects the probe for measurements in bores from 12 mm diameter.
Contact to the workpiece is made by precisely polished support shafts. This guarantees permanent, stable workpiece support. A height measuring stand can turn the W5 in a complete measuring station for tasks that require precise positioning.
All the necessary functions are covered with just one USB port:
- Battery charging function or permanent power supply
- USB connection to PC to transfer parameters and profile data
- External controls via foot switch
- Remote controls via TURBO DATAWAVE
With Jenoptik's powerful TURBO DATAWAVE basic software (optional) the measurement results from the W5 can be transferred into an Excel spreadsheet on a PC for further processing and documentation. TURBO DATAWAVE expert – professional evaluation software with a simple menu guide -- is optional evaluation software for PC-controlled programming and parameter analysis and provides the ability to control the W5 remotely.
Mobile printer
The compact thermal printer documents the measurement results on the spot — using Bluetooth® without awkward cables. The roughness measuring instrument remains mobile, even if the measurements need to be documented. Easy to insert paper thanks to “Easy Paper Loading” technology: insert roll of paper, close cover, done. The printer is controlled from the roughness measuring instrument.
The robust, fiber glass-reinforced plastic casing is designed for industrial use. Up to five rolls of paper can be printed with one battery charge. The printer therefore stays ready for use for a long time.Measuring conditions, parameters, tolerance evaluation, roughness profile and Abbott curve: depending on the measuring program, this information can be printed off individually or in combinations.
Waveline W5 specifics:
- Total deviation acc. to DIN 4772 Class 1
- Measurement range/resolution 320 microns
- Probe is an inductive skid probe
- Measurement display is micron/microinch selectable
- Max. traverse length is 17.5 mm
- Traverse speed 0.15 / 0.5 / 1 mm/sec; return: 3 mm/sec
- Individual traverse lengths 1-5 selectable
-
Jenoptik Industrial Metrology Division
Go back to the main Product Spotlights page.
Get our new eMagazine delivered to your inbox every month.
Stay in the know with Quality’s comprehensive coverage of the manufacturing and metrology industries.
SUBSCRIBE TODAY!Copyright ©2024. All Rights Reserved BNP Media.
Design, CMS, Hosting & Web Development :: ePublishing